DXO ViewPoint 2 review
Couple of days ago I have received a newsletter from the friends from Topaz Labs , featuring an offer for ViewPoint 2, software made by their partners DXO. I knew about DXO before from their well known DXOMarks, cameras and lenses reviews, benchmarking’s and ratings, but I was not aware that they are also producing photographic software’s. The geek in me was really curious and decided to give ViewPoint 2 a try. View Point comes as both Photoshop plugin and standalone application and according to their website: “The indispensable companion to your wide-angle lens, DxO ViewPoint fixes perspectives and easily restores the natural shapes of the subjects located along image edges.” As an architecture photographer I was getting interested to learn more about this, so I installed the trial version and watched a quick tutorial movie.
Since I am a Photoshop user, I am much more interested in the plugin version, as it integrates much easily in my workflow, so this is what I have used for this review. Opening the ViewPoint2, I was positively impressed by an easy to use and clean user interface: big space in the left for the processed image or for a before&after display. The menu is in the right, collapsible, to allow a larger visualization of the working area. The corrections are split into 5 difference sections: Distortion, Volume Deformation, Perspective, Horizon and Crop.
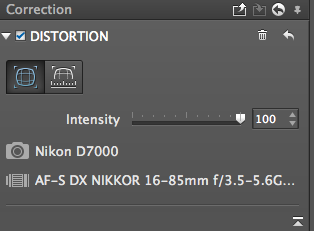
Distortion has both automatic and manual version. The automatic version uses the DXO Optic module and downloads the camera/lens specific information based on the exif. Since DXO are testing so many cameras and lenses, I would guess they cover quite a lot of combinations.
The manual method handles 3 different types of distortion: Barrel, Pincushion and Fisheye. A slider is controlling the intensity of the distortion correction.
Volume Distortion is designed to correct the deformation of the objects located at the edges of the frame when a ultra wide lens is used. It is pretty much useful when photographing a group of people to correct the hideous deformation affecting the ones located in extreme left or right of the frame, stretched due to the curve of the lens. I am not doing this type of shots but it could be useful for ultra wide landscapes when an object is included in the foreground if it appears as stretched and unnatural.
Perspective is the feature that seems to be the most interesting for me. It has 4 modes:
- Force vertical parallel – 4 anchor points are available across 2 vertical parallel lines in oder to correct the inherent vertical distortion due to lack of a TS lens
- Force horizontal parallel – very similar to the above, is targeting the horizontal parallels, useful especially when the shooting direction is not perpendicular to a large horizontal object.
- Rectangle offers 4 points, positioned in a quadrilateral shape, that after correction will be transformed in a rectangle. Useful for large distorted rectangular buildings
- 8 points – offers similar concept as Rectangle but in this case there is no need to have a rectangular subject, but 2 sets of parallels, 2 vertical and 2 horizontal, determined by 8 anchor points.
After applying perspective settings, View Point displays black colour in the areas lost due to the correction.
Horizon is doing rotations of the image, usually necessary when the horizon or other relevant guidance line is bent. This correction has anchor points option, both horizontally and vertically, but also allows the user to input the angle of the rotation.
Crop is a great way of completing your distortion correction. As we are used already, it has both Auto and Manual mode. In Auto Mode, ViewPoint is automatically making a suggestion of the best crop. In Manual mode, the user is allowed to decide on the crop. In both cases various aspect ratios are allowed: 16/9, 5/4, 5/2, 2/1, 3/2, 4/3 and 1/1; custom aspect ratios are also possible; if entered once, the custom aspect ratio is remembered and available during the aspect ratio selection. Checking “Constrain to image”, force the crop to stay only in the part of image that contains information, keeping out the black areas generated during the perspective corrections.
Other things to add: zooming is nicely available when scrolling the mouse; when pressing the Space key or H, the mouse cursor transforms into a hand tool and allows navigation on the image when zoomed in (familiar from Photoshop). While cropping, a grid showing the thirds of the image can be displayed, letting you focus at rules of thirds if interested. As a suggestion, I would like to see some other grid types like Golden Rule of Golden Spiral (already available in Photoshop CC).
The standalone application has exactly the same functionality as the plugin. It works with tiff or jpeg files and allows you to save tiff or jpeg format as well. If you are basing your workflow in Photoshop or Lightroom, it is a bit over the hand to use it.
Conclusion: View Point2 is a pleasant surprise. A very easy to use piece of software, extremely intuitive and with very clear functionality. The anchor points system makes life much easier for perspective corrections and I find it much easier to use than Lens Correction on Photoshop. I bought it for a reduced price of 39$ because of the partnership with Topaz, but currently it is available with 49$ (also discount price from 79$) on DXO website. A watermark free trial is available for 31 days.


Comments
Post a Comment